You can Download a zip file containg everything here
(26k).
Overview
This tutorial is designed to give beginners the knowledge to create Dynamic
Menus, as well as an "eye-opener" to the possibilities of Dreamweaver.
The Beginning
If you're using Dreamweaver 3 then add the Netscape fix from the "Commands"
menu If you're using DW 2, there are plenty of free extensions for adding a
Netscape fix.
Step 1
Create a layer and rename it "MenuBase" or anything else you
want.
Step 2
Add a table to the layer with one row and as many columns as you need for
different menus. I used 3 in this example. Enter the names of your menus, e.g....
Menu 1, Menu2, and Menu 3...
Step 3
Create a new Style Sheet file by "right clicking (windows)" or "option
clicking (Mac)" and picking "Edit Style Sheet..." (or doubleclick
on the style "(none)" in the "CSS Styles"
window.
Under the "CSS Styles" Menu. Click the "Link" button and
browse to your site root folder, enter a name for your Style Sheet e.g.... "Menu.css"
Click "OK" and double click on your newly created style sheet. Click
on "New" and pick the "Use CSS selector"
Pick "a:hover" and click OK. Set the following to:
Font
"Verdana, Arial, Helvetica, sans-serif"
Size 8 points
Color red
Leave everything else at its default and click OK.
Now Click on the "New" button again and pick Make "Custom Style(class)"
and type in ".white" where it says ".unnamed1"
Set the following:
Font
"Verdana, Arial, Helvetica, sans-serif"
Size
8 points
Color white
Font Deceleration None
Leave everything else at its default and click OK.
Click "Save" and "Done"
Step 4
If you don't already have it open, open the CSS Styles window "F7"
Highlight each of the text for each menu and add a link into the "Link
requester" e.g.... "#" AFTER YOU HAVE ADDED THE LINK!!! While
it's still highlighted, click on the "white" Style in
the CSS Styles window.
Select the table and change the Back Ground color to black
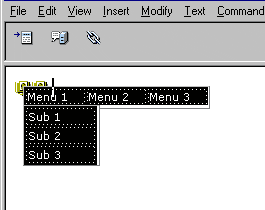
Create a new layer and rename it "Sub1"
add as many sub items as you'd like, I used 3: Sub 1, Sub 2, Sub 3.
Position the layer so that it is touching the bottom of the "MenuBase"
layer.
Apply Step 4 to the layer once it's in position...
You should have something similar to this:
Repeat this for Menu 2 and 3's sub menus.
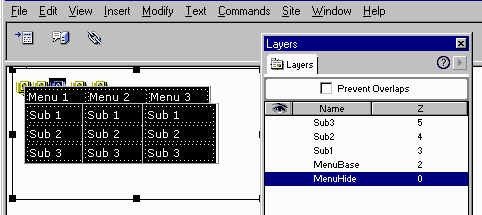
Step 6
Create one more layer and name it "MenuHide" in the "Layers
Window" (F11) click and drag MenuHide to the bottom,
or simply change Z order to 0. This is going to be the layer that hides the
menus on mouse out... (pretty self explanatory)
In the MenuHide layer, add a 1 x 1 pixel transparent GIF, resize the
GIF and layer so that it surrounds the area around the menu, in short anywhere
you think the user may scroll off...( I used 245 x 130)
You should have something similar to this:
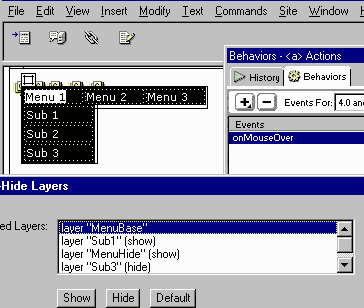
Step 7
Now it gets to the tricky part... OK, it's not that tricky but it sounded good...
Hide all of the "Sub" Layers, and the "MenuHide"
Layer. Open the "Behavior inspector" (F8)
Select "Menu 1" Click on the:
and add the "Show-Hide Layers" behavior.
Set the following:
It's important to have the "MenuHide" layer only show on
the "onMouseOver" So that if you have text or links underneath
or around the menu, the won't get covered by the transparent GIF, and not be
clickable!
You should have something that looks like this:
Repeat this for "Menu 2", and "Menu 3" Showing and hiding
the correct layers.
Step 8
Select the "MenuHide" layer, and click on the GIF...
Add a "Show-Hide Layers" and have it hide everything but the
"MenuBase"
(keep in mind that although the menu will work in Netscape, the
"a:hover" will not, this is the only cross browser limitation)
Some more to think about...
Keep in mind that this is a very basic tutorial, and was meant for beginners
to get an idea and techniques for making dynamic menus... this is in no way
the limits of DW or DHTML. Using your creativity and skills can produce some
outstanding results... If you always plan ahead, creating some impressive menus
doesn't take that long... Experiment with adding timelines and sub menus, Timelines
can be Dreamweavers best friend sometimes... Experiment with background
images and play around with the style sheets... Don't let this tutorial
become your limit, and never be afraid to expand...